
We’ve all seen AI write essays, compose music, and even paint jaw-dropping portraits. Yet there is another frontier that is way more exciting – AI-generated videos. Imagine stepping into a movie scene, sending an animated greeting, or witnessing a historical reenactment, all crafted by AI. Until now, most of us were just curious spectators, giving instructions and hoping for the coolest output. But what if you could go beyond that and build your own video generation webapp?
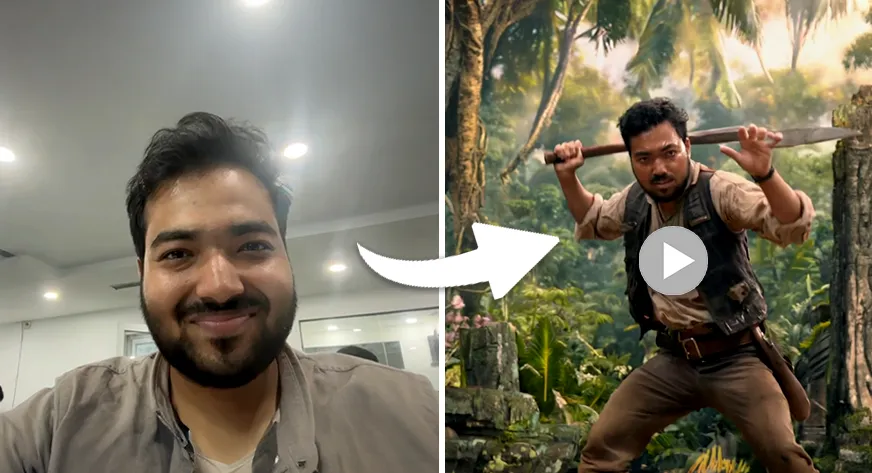
That’s exactly what I did with Time Capsule. Here is how it works: you upload a photo, pick a time period, select a profession, and just like that, you are transported into the past with a personalized image and a short video. Simple, right? But the real magic happened when I took this idea to the Data Hack Summit, the most futuristic AI conference in India.
We turned Time Capsule into a GenAI playground booth designed purely for fun and engagement. It became the favourite booth not just for attendees, but for speakers and GenAI leaders too. Watching people’s faces light up as they saw themselves as astronauts, kings, or Victorian-era scholars reminded me why building with AI is so thrilling.
So I thought, why not share this idea with the lovely audience of AnalyticsVidhya. Buckle up, as I take you behind the scenes of how Time Capsule went from an idea to an interactive video generation webapp.
The Concept of a Video Generation WebApp (With Time Capsule Example)
At its core, a video generation webapp is any application that takes user input and transforms it into a short, AI-created video. The input could be a selfie, text, or a few simple choices. The AI then turns them into moving visuals that feel unique and personal.
Every video generation app works through three main blocks:
- Input: What the user provides – this could be a photo, text, or selections.
- Transformation: The AI interprets the input and creates visuals.
- Output: The final result, delivered as a video (and sometimes an image too).
The real power lies in personalization: Generic AI videos online can be fun, but videos starring you instantly become more engaging and memorable.
Concepts like Time Capsule thrive because they don’t just generate random clips, they generate your story, or in this case, your journey through time.
How Time Capsule Works
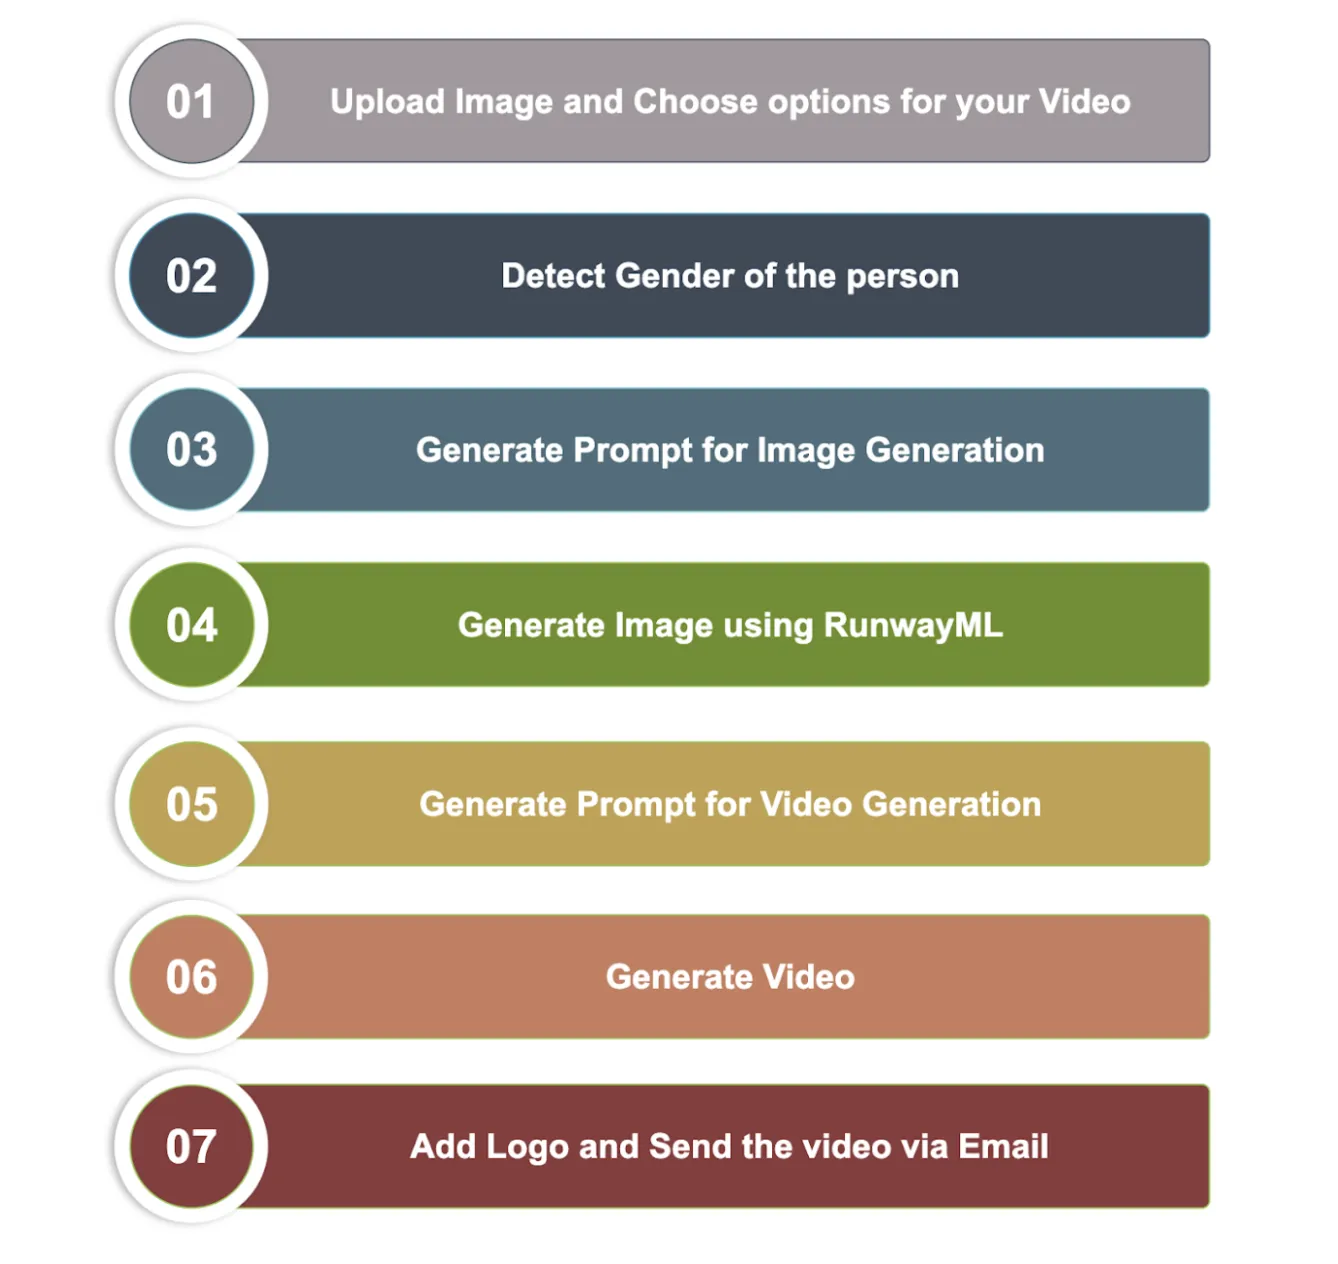
Here is the short and straightforward way in which Time Capsule, our video generation webapp, works.
- Upload a photo of yourself.
- Select ethnicity, time period, profession, and action.
- AI generates a personalized portrait and short video.
Once done, you receive your own time-travel experience, whether as a Roman gladiator, a Renaissance artist, or even a futuristic explorer.
Now that you’ve seen how the process works, it’s time to start building your own ‘Time Capsule’.
Technologies Used in TimeCapsule
Here are all the technologies used in building our very own video generation webapp – TimeCapsule.
Programming Language
- Python: Core language for scripting the application and integrating AI services.
AI & Generative Models
- OpenAI API: For enhancing prompts and generating text-based guidance for images and videos.
- Google Gemini (genai): For image analysis (e.g., gender detection) and generative tasks.
- RunwayML: AI image generation from prompts and reference images.
- fal_client (FAL AI): Accessing Seeddance pro model for video generation from a single image and action prompt.
Computer Vision
- OpenCV (cv2): Capturing images from a webcam and processing video frames.
- Pillow (PIL): Handling images, overlays, and adding a logo to videos.
- NumPy: Array manipulation for images and frames during video processing.
Email Integration
- Yagmail: Sending emails with attachments (generated image and video).
Utilities & System
- Requests: Downloading generated images and videos via HTTP requests.
- uuid: Generating unique identifiers for files.
- os: Directory creation, file management, and environment access.
- dotenv: Loading API keys and credentials from .env files.
- datetime: Timestamping generated files.
- base64: Encoding images for API uploads.
- enum: Defining structured options for ethnicity, time period, profession, and actions.
- re: Sanitizing and cleaning text prompts for AI input.
How to Make Your Own Time Capsule
Now that you know all the elements that make the Time Capsule possible, here is the exact, step-by-step blueprint to make your own video-generation webapp.
1. Import All Libraries
You will first have to import all necessary libraries for the project.
import cv2
import os
import uuid
import base64
import requests
import yagmail
import fal_client
import numpy as np
from PIL import Image
import google.generativeai as genai
from enum import Enum
from dotenv import load_dotenv
from openai import OpenAI
from datetime import datetime
import time
import re
from runwayml import RunwayML


# Load environment variables
load_dotenv()
2. Input from User
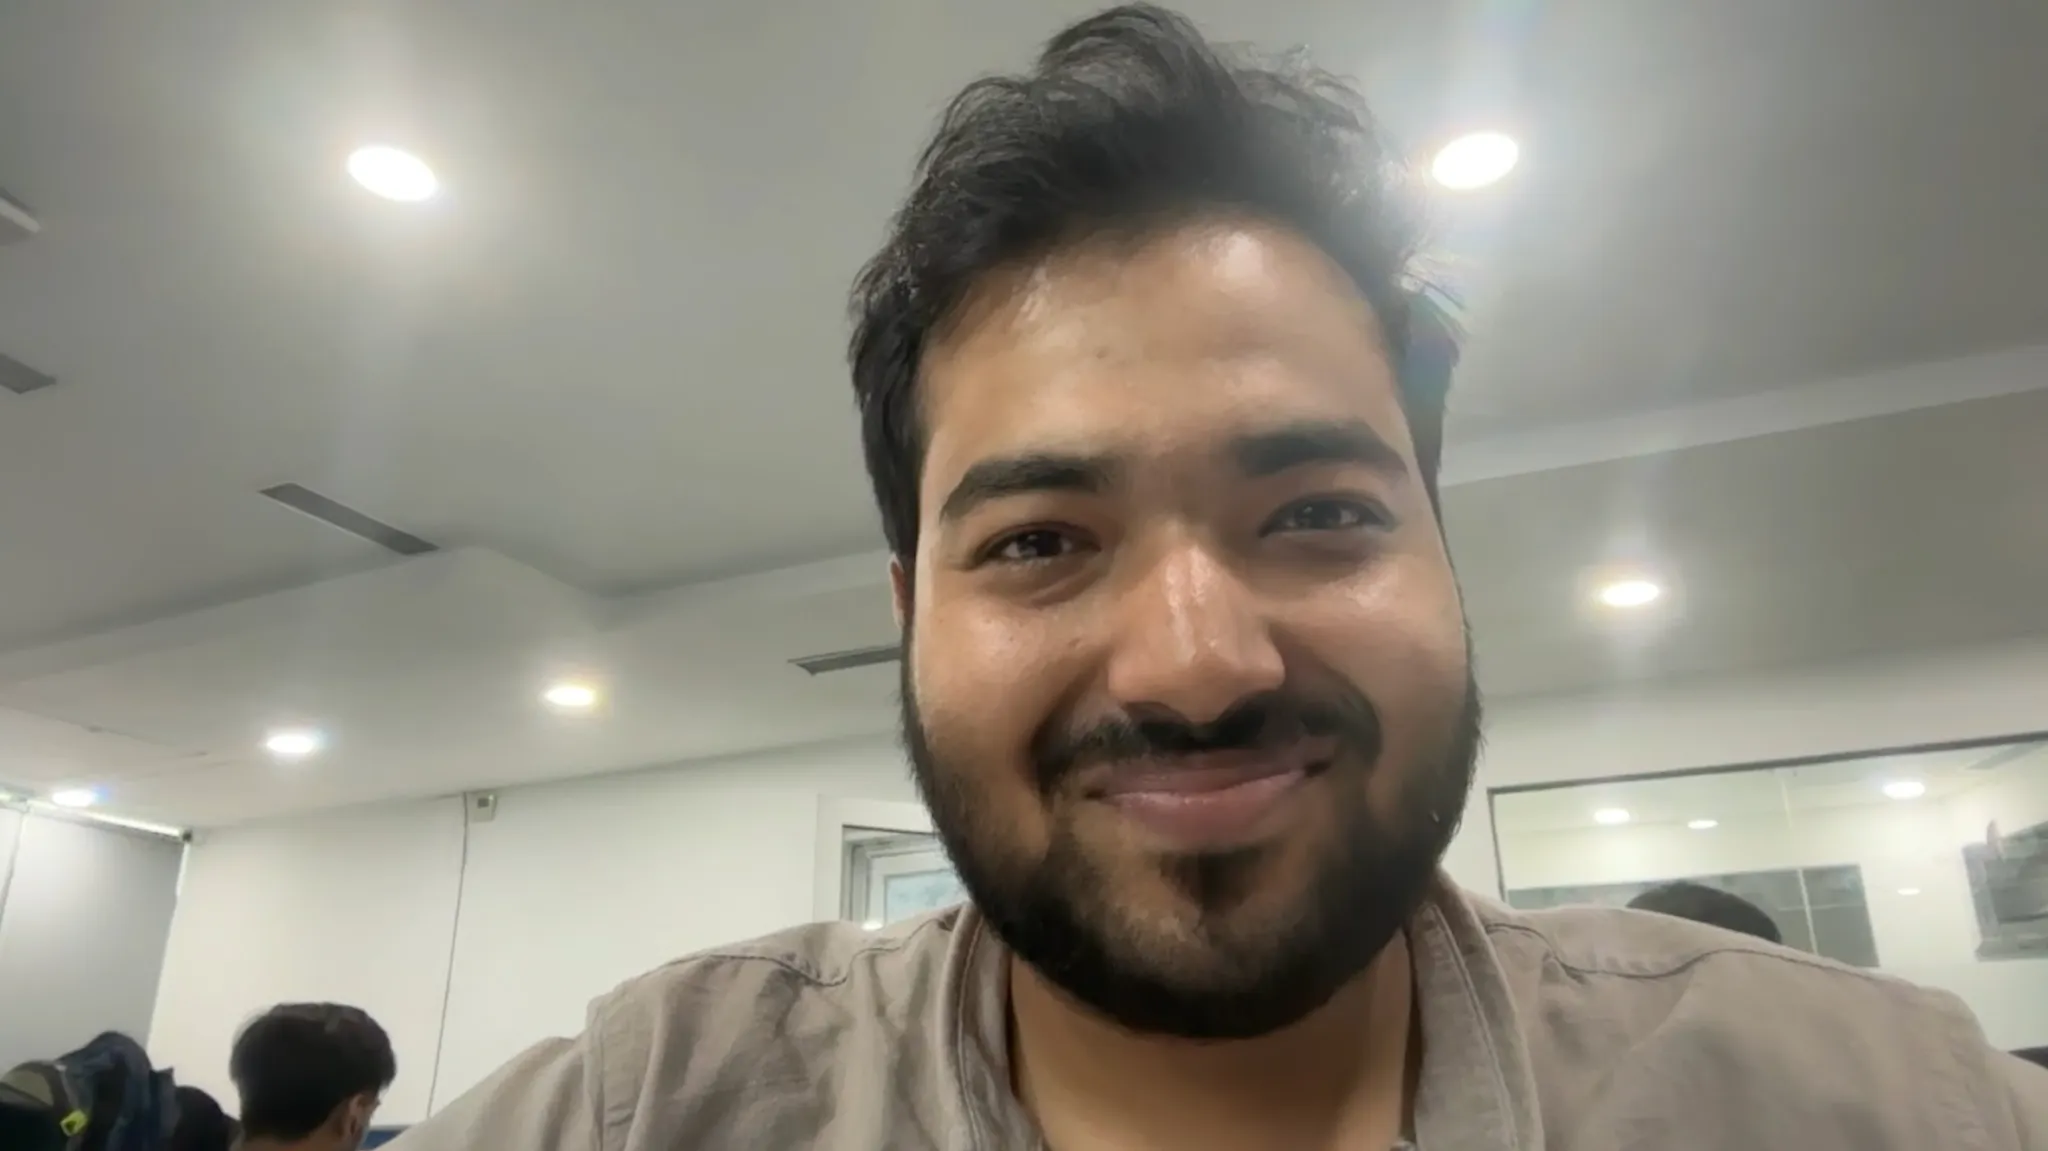
The process of the web app starts with the user uploading a personal photo. This photo forms the foundation of the AI-generated character. Users then select ethnicity, time period, profession, and action, providing structured input that guides the AI. This ensures the generated image and video are personalized, contextually accurate, and visually engaging.
Capture Image
The capture_image method uses OpenCV to take a photo from the user’s camera. Users can press SPACE to capture or ESC to cancel. It includes fallbacks for cases when the camera GUI isn’t available, automatically capturing an image if needed. Each photo is saved with a unique filename to avoid overwriting.
1. Initialize Camera
Here are the steps to initialize the camera.
cap = cv2.VideoCapture(0)- Opens the default camera (device 0).
- Checks if the camera is accessible; if not, prints an error and exits.
2. Start Capture Loop
while True:
ret, frame = cap.read()- Continuously reads frames from the camera.
- ret is True if a frame is successfully captured.
- The frame contains the actual image data.
3. Display the Camera Feed
Try:
cv2.imshow('Camera - Press SPACE to capture, ESC to exit', frame)
       key = cv2.waitKey(1) & 0xFF
except cv2.error as e:
       # If GUI display fails, use automatic capture after delay
       print("GUI display not available. Using automatic capture...")
       print("Capturing image in 3 seconds...")
       time.sleep(3)
key = 32 # Simulate SPACE key press- Shows the live camera feed in a window.
- Waits for user input:
– SPACE (32) → Capture the image.
– ESC (27) → Cancel capture. - Fallback: If the GUI display fails (e.g., running in a headless environment), the code waits 3 seconds and automatically captures the image.
4. Save the Image
unique_id = str(uuid.uuid4())
timestamp = datetime.now().strftime("%Y%m%d_%H%M%S")
filename = f"captured_{timestamp}_{unique_id}.jpg"
filepath = os.path.join('captured_images', filename)
# Save the image
cv2.imwrite(filepath, frame)
Here is the complete code to capture the image, in one piece:
def capture_image(self):
       """Capture image using OpenCV with fallback methods"""
       print("Initializing camera...")
       cap = cv2.VideoCapture(0)

       if not cap.isOpened():
           print("Error: Could not open camera")
           return None

       try:
           print("Camera ready! Press SPACE to capture image, ESC to exit")

           while True:
               ret, frame = cap.read()
               if not ret:
                   print("Error: Could not read frame")
                   break

               # Try to display the frame
               try:
                   cv2.imshow('Camera - Press SPACE to capture, ESC to exit', frame)
                   key = cv2.waitKey(1) & 0xFF
               except cv2.error as e:
                   # If GUI display fails, use automatic capture after delay
                   print("GUI display not available. Using automatic capture...")
                   print("Capturing image in 3 seconds...")
                   # import time
                   time.sleep(3)
                   key = 32  # Simulate SPACE key press
                if key == 32:  # SPACE key
                   # Generate UUID for unique filename
                   unique_id = str(uuid.uuid4())
                   timestamp = datetime.now().strftime("%Y%m%d_%H%M%S")
                   filename = f"captured_{timestamp}_{unique_id}.jpg"
                   filepath = os.path.join('captured_images', filename)

                   # Save the image
                   cv2.imwrite(filepath, frame)
                   print(f"Image captured and saved as: {filepath}")
                   break
               elif key == 27:  # ESC key
                   print("Capture cancelled")
                   filepath = None
                   break

       except Exception as e:
           print(f"Error during image capture: {e}")
           # Fallback: capture without GUI
           print("Attempting fallback capture...")
           try:
               ret, frame = cap.read()
               if ret:
                   unique_id = str(uuid.uuid4())
                   timestamp = datetime.now().strftime("%Y%m%d_%H%M%S")
                   filename = f"captured_{timestamp}_{unique_id}.jpg"
                   filepath = os.path.join('captured_images', filename)
                   cv2.imwrite(filepath, frame)
                   print(f"Fallback image captured and saved as: {filepath}")
               else:
                   filepath = None
           except Exception as e2:
               print(f"Fallback capture also failed: {e2}")
               filepath = None

       finally:
           cap.release()
           try:
               cv2.destroyAllWindows()
           except:
               pass  # Ignore if GUI cleanup fails

       return filepath
Output:
Choose ethnicity, Time period, Profession, and Action
The get_user_selections method allows users to customize their character by choosing from the following options: ethnicity, time period, profession, and action. Options are displayed with numbers, and the user inputs their choice. The selections are returned and used to create a personalized image and video.
Here are all the options available to choose from:
class EthnicityOptions(Enum):
   CAUCASIAN = "Caucasian"
   AFRICAN = "African"
   ASIAN = "Asian"
   HISPANIC = "Hispanic"
   MIDDLE_EASTERN = "Middle Eastern"
   MIXED = "Mixed Heritage"


class TimePeriodOptions(Enum):
   Jurassic = "Jurassic Period (200-145 million ago)"
   ANCIENT = "Ancient Times (Before 500 AD)"
   MEDIEVAL = "Medieval (500-1500 AD)"
   RENAISSANCE = "Renaissance (1400-1600)"
   COLONIAL = "Colonial Era (1600-1800)"
   VICTORIAN = "Victorian Era (1800-1900)"
   EARLY_20TH = "Early 20th Century (1900-1950)"
   MID_20TH = "Mid 20th Century (1950-1990)"
   MODERN = "Modern Era (1990-Present)"
   FUTURISTIC = "Futuristic (Near Future)"


class ProfessionOptions(Enum):
   WARRIOR = "Warrior/Soldier"
   SCHOLAR = "Scholar/Teacher"
   MERCHANT = "Merchant/Trader"
   ARTISAN = "Artisan/Craftsperson"
   FARMER = "Farmer/Agricultural Worker"
   HEALER = "Healer/Medical Professional"
   ENTERTAINER = "Entertainer/Performer"
   NOBLE = "Noble/Aristocrat"
   EXPLORER = "Explorer/Adventurer"
   SPIRITUAL = "Spiritual Leader/Clergy"


class ActionOptions(Enum):
   SELFIE = "Taking a selfie from camera view"
   DANCING = "Dancing to music"
   WORK_ACTION = "Performing work/professional action"
   WALKING = "Simple walking"
   COMBAT = "Combat/fighting action"
   CRAFTING = "Crafting/creating something"
   SPEAKING = "Speaking/giving a speech"
   CELEBRATION = "Celebrating/cheering"
Here is the code block to capture the selection:
def get_user_selections(self):
       """Get user selections for character customization"""
       print("\n=== Character Customization ===")

       # Ethnicity selection
       print("\nSelect Ethnicity:")
       for i, option in enumerate(EthnicityOptions, 1):
           print(f"{i}. {option.value}")
       ethnicity_choice = int(input("Enter choice (1-6): ")) - 1
       ethnicity = list(EthnicityOptions)[ethnicity_choice]

       # Time Period selection
       print("\nSelect Time Period:")
       for i, option in enumerate(TimePeriodOptions, 1):
           print(f"{i}. {option.value}")
       period_choice = int(input("Enter choice (1-9): ")) - 1
       time_period = list(TimePeriodOptions)[period_choice]

       # Profession selection
       print("\nSelect Profession:")
       for i, option in enumerate(ProfessionOptions, 1):
           print(f"{i}. {option.value}")
       profession_choice = int(input("Enter choice (1-10): ")) - 1
       profession = list(ProfessionOptions)[profession_choice]


       # Action Selection
       print("\n=== Video Action Selection ===")
       for i, action in enumerate(ActionOptions, 1):
           print(f"{i}. {action.value}")

       action_choice = int(input("Select action (1-8): ")) - 1
       action_choice =  list(ActionOptions)[action_choice]


       return ethnicity, time_period, profession,action_choice
Detect Gender from the Image
The detect_gender_from_image function uses Google Gemini 2.0 Flash to identify the gender from an uploaded image. It handles errors gracefully, returning ‘person’ if detection fails. This helps personalize the generated video, ensuring the model accurately represents the user and avoids generating a male image for a female or vice versa.
def detect_gender_from_image(self, image_path):
"""Detect gender from captured image using Google Gemini 2.0 Flash"""
       try:
       	print("Analyzing image to detect gender...")
           	# Upload image to Gemini
           	uploaded_file = genai.upload_file(image_path)

           	# Wait for the file to be processed
           	# import time
           	while uploaded_file.state.name == "PROCESSING":
              	print("Processing image...")
              	time.sleep(2)
              	uploaded_file = genai.get_file(uploaded_file.name)

           	if uploaded_file.state.name == "FAILED":
               	print("Failed to process image")
               	return 'person'

           	# Generate response
           	response = self.gemini_model.generate_content([
               uploaded_file,
               "Look at this image and determine if the person appears to be male or female. Respond with only one word: 'male' or 'female'."
           ])

           	# Clean up the uploaded file
           	genai.delete_file(uploaded_file.name)

           	gender = response.text.strip().lower()
           	if gender in ['male', 'female']:
               	return gender
           	else:
               	return 'person'  # fallback

except Exception as e:
       	print(f"Error detecting gender with Gemini: {e}")
           	return 'person'  # fallback
3. Generate an Image from the Inputs
Now that we have the input from the user for all the parameters, we shall proceed to creating an AI image using the same. Here are the steps for that:
Generate a Prompt for Image Generation
After collecting the user’s selections, we use the enhance_image_prompt_with_openai function to create a detailed and engaging prompt for the image generation model. It transforms the basic inputs like gender, ethnicity, profession, time period, and action into a creative, professional, and age-appropriate prompt, ensuring the generated images are accurate, visually appealing, and personalized.
For this, we are using the “gpt-4.1-mini” model with a temperature of 0.5 to introduce some randomness and creativity. If the OpenAI service encounters an error, the function falls back to a simple default prompt, keeping the video generation process smooth and uninterrupted.
def enhance_image_prompt_with_openai(self, ethnicity, time_period, profession, gender,action):
"""Use OpenAI to enhance the image prompt based on user selections"""
       base_prompt = f"""
       Create a simple, clean prompt for AI image generation:
       - Gender: {gender}
       - Ethnicity: {ethnicity.value}
       - Profession: {profession.value}
       - Time period: {time_period.value}
       - Performing Action: {action.value}
       - Show appropriate clothing and setting
       - Make the background a bit unique in the prompt
       - Keep it appropriate for all ages
       - Maximum 30 words
       """
       try:
           response = self.openai_client.chat.completions.create(
               model="gpt-4.1-mini",
               messages=[{"role": "user", "content": base_prompt}],
               max_tokens=80,
               temperature=0.5
           )
           enhanced_prompt = response.choices[0].message.content.strip()
           return enhanced_prompt
       except Exception as e:
           print(f"Error with OpenAI: {e}")
           # Fallback prompt
           return f"{gender} {ethnicity.value} {profession.value} from {time_period.value} performing {action.value}, professional portrait"
After generating a prompt, we need to clean and sanitize it for API compatibility. Here is the function for sanitizing the prompt.
def sanitize_prompt(self, prompt):
"""Sanitize and limit prompt for API compatibility"""
       # Remove problematic characters and limit length
       import re

       # Remove extra whitespace and newlines
       prompt = re.sub(r'\s+', ' ', prompt.strip())

       # Remove special characters that might cause issues
       prompt = re.sub(r'[^\w\s,.-]', '', prompt)

       # Limit to 100 words maximum
       words = prompt.split()
       if len(words) > 100:
           prompt=" ".join(words[100])

       # Ensure it's not empty
       if not prompt:
           prompt = "Professional portrait photograph"
       return prompt
Generate Data URI for the Image
The image_to_data_uri function converts an image into a Data URI, allowing it to be sent directly in API requests or embedded in HTML. It encodes the file as Base64, detects its type (JPEG, PNG, or GIF), and creates a compact string format for seamless integration.
 def image_to_data_uri(self, filepath):
       """Convert image file to data URI for API"""
       with open(filepath, "rb") as image_file:
           encoded_string = base64.b64encode(image_file.read()).decode('utf-8')

           mime_type = "image/jpeg"
           if filepath.lower().endswith(".png"):
               mime_type = "image/png"
           elif filepath.lower().endswith(".gif"):
               mime_type = "image/gif"

           return f"data:{mime_type};base64,{encoded_string}"
Generate Image using RunwayML
Once we have generated the Prompt and Data URI of the Image. Now its time for the AI to do its magic. We will use runwayML to generate Image. You can use different image generation tool available in the market.
The function generate_image_with_runway is responsible for generating an image using RunwayML.
Import and initialize RunwayML
from runwayml import RunwayML
runway_client = RunwayML()
It loads the RunwayML library and creates a client to interact with the API.
Prepare the prompt
print(f"Using prompt: {prompt}")
print(f"Prompt length: {len(prompt)} characters")
# Sanitize prompt one more time
prompt = self.sanitize_prompt(prompt)
The prompt provided by the user is printed and cleaned (sanitized) to ensure it doesn’t break the model.
Convert reference image
data_uri = self.image_to_data_uri(image_path)The input image is converted into a Data URI (a Base64 string) so it can be passed to RunwayML as a reference.
Generate image with RunwayML
task = runway_client.text_to_image.create(
model="gen4_image",
prompt_text=prompt,
ratio='1360:768',
reference_images=[{
"uri": data_uri}]
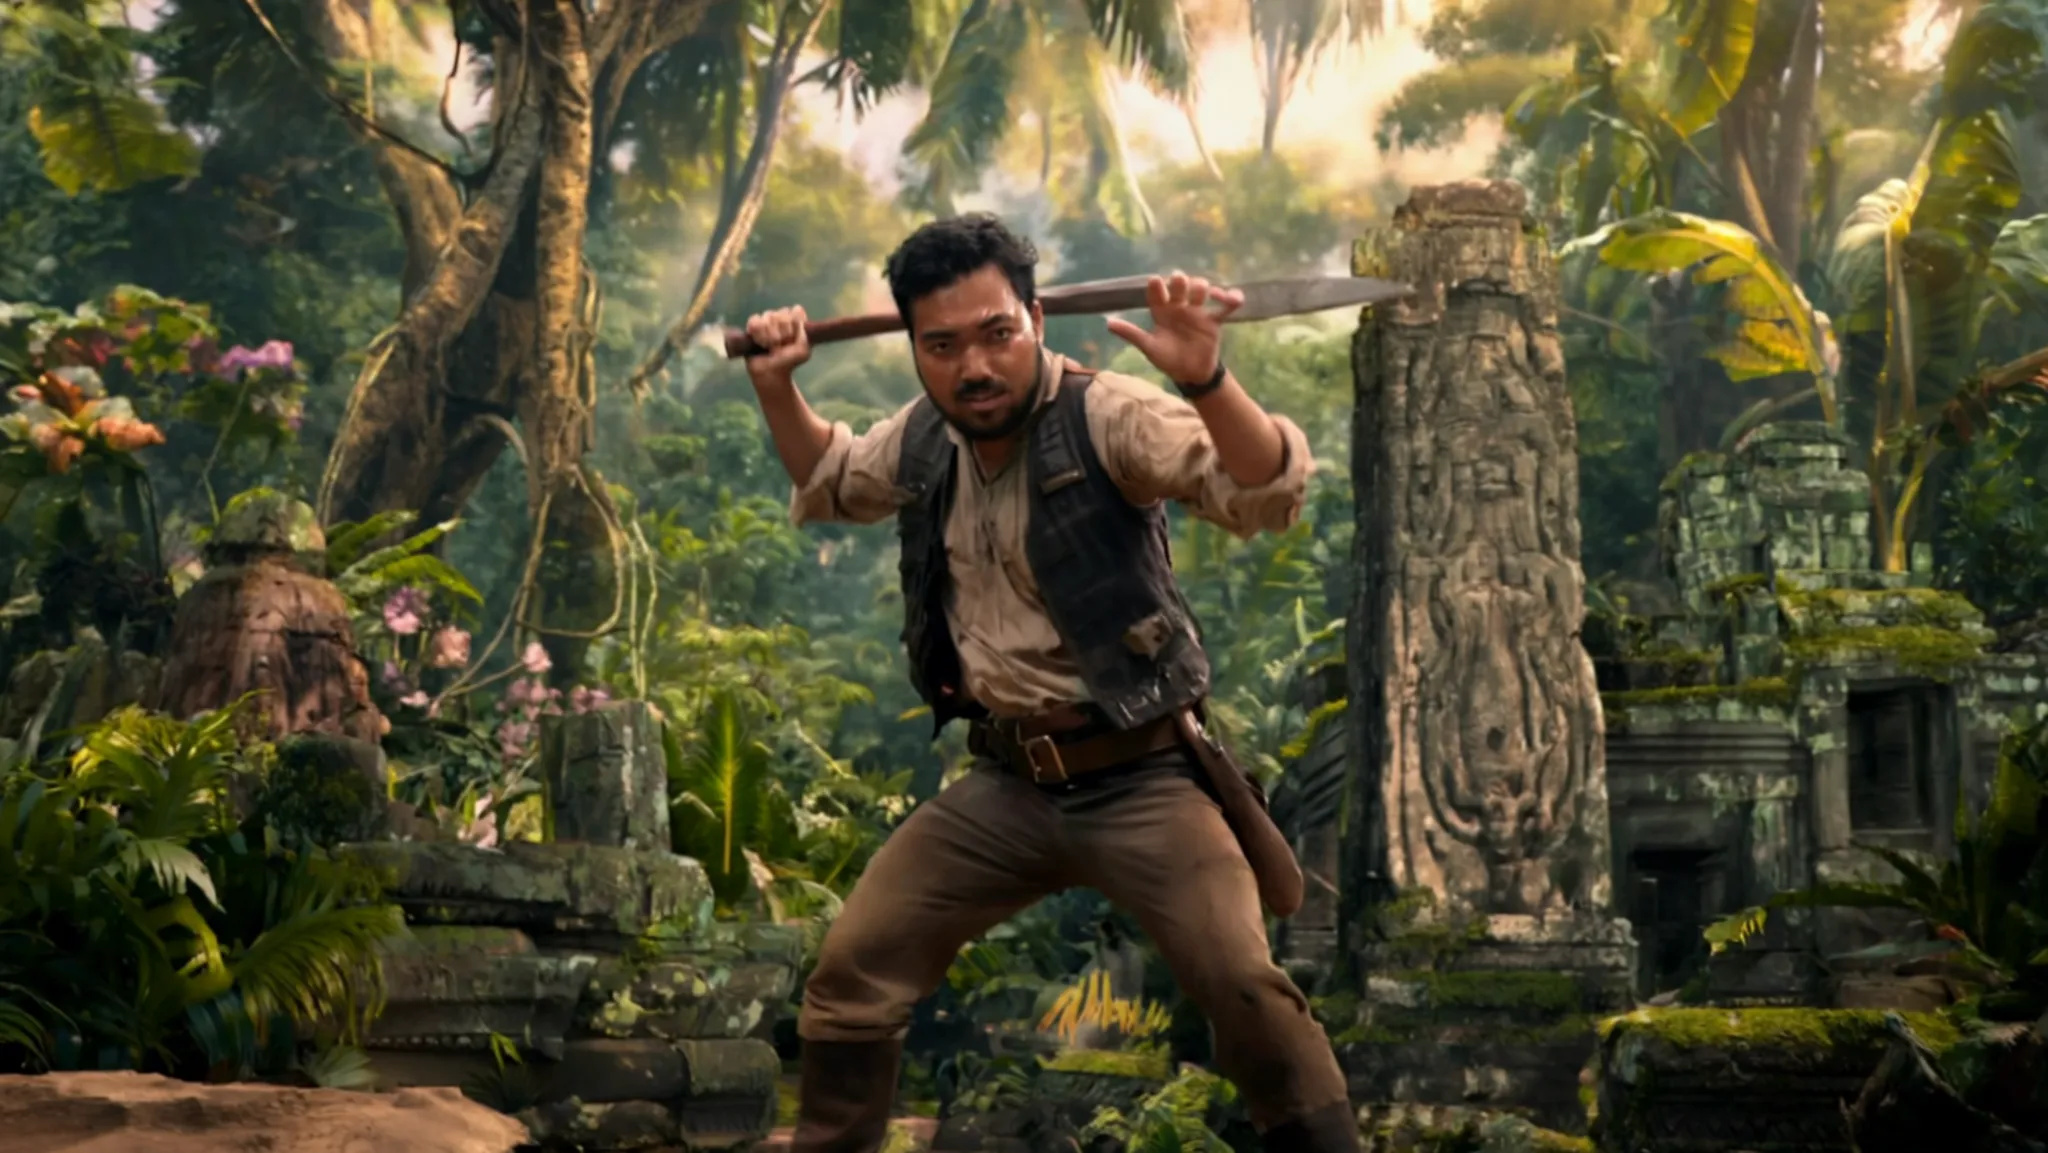
).wait_for_task_output()It sends the sanitized prompt + reference image to RunwayML’s gen4_image model to generate a new image.
Download and save the generated image
image_url = task.output[0]
response = requests.get(image_url)


unique_id = str(uuid.uuid4())
timestamp = datetime.now().strftime("%Y%m%d_%H%M%S")
filename = f"generated_{timestamp}_{unique_id}.png"
filepath = os.path.join('intermediate_images', filename)
Once RunwayML returns a URL, it downloads the image. A unique filename (based on time and UUID) is created, and the image is saved in the intermediate_images folder.
Error handling & fallback
- If something goes wrong with the main prompt, the function retries with a simpler prompt (just ethnicity + profession).
- If even that fails, it returns None.
Here the whole Code Block for Image Generation:
def generate_image_with_runway(self, image_path, prompt, ethnicity, time_period, profession):
"""Generate image using RunwayML"""
       try:
           runway_client = RunwayML()

           print("Generating image with RunwayML...")
           print(f"Using prompt: {prompt}")
           print(f"Prompt length: {len(prompt)} characters")

           # Sanitize prompt one more time
           prompt = self.sanitize_prompt(prompt)
           print(f"Sanitized prompt: {prompt}")

           data_uri = self.image_to_data_uri(image_path)

           task = runway_client.text_to_image.create(
               model="gen4_image",
               prompt_text=prompt,
               ratio='1360:768',
               reference_images=[{
                   "uri": data_uri
               }]
           ).wait_for_task_output()

           # Download the generated image
           image_url = task.output[0]
           response = requests.get(image_url)

           if response.status_code == 200:
               # Generate unique filename
               unique_id = str(uuid.uuid4())
               timestamp = datetime.now().strftime("%Y%m%d_%H%M%S")
               filename = f"generated_{timestamp}_{unique_id}.png"
               filepath = os.path.join('intermediate_images', filename)

               with open(filepath, 'wb') as f:
                   f.write(response.content)

               print(f"Generated image saved as: {filepath}")
               return filepath
           else:
               print(f"Failed to download image. Status code: {response.status_code}")
               return None

       except Exception as e:
           print(f"Error generating image: {e}")
           print("Trying with a simpler prompt...")

           # Fallback with very simple prompt
           simple_prompt = f"{ethnicity.value} {profession.value} portrait"
           try:
               data_uri = self.image_to_data_uri(image_path)

               task = runway_client.text_to_image.create(
                   model="gen4_image",
                   prompt_text=simple_prompt,
                   ratio='1360:768',
                   reference_images=[{
                       "uri": data_uri
                   }]
               ).wait_for_task_output()

               # Download the generated image
               image_url = task.output[0]
               response = requests.get(image_url)

               if response.status_code == 200:
                   # Generate unique filename
                   unique_id = str(uuid.uuid4())
                   timestamp = datetime.now().strftime("%Y%m%d_%H%M%S")
                   filename = f"generated_{timestamp}_{unique_id}.png"
                   filepath = os.path.join('intermediate_images', filename)

                   with open(filepath, 'wb') as f:
                       f.write(response.content)

                   print(f"Generated image saved as: {filepath}")
                   return filepath
               else:
                   print(f"Failed to download image. Status code: {response.status_code}")
                   return None

           except Exception as e2:
               print(f"Fallback also failed: {e2}")
               return None
Output:
4. Generate Video from the Image
Now that we have generated an image based exactly on the user input, here is the process to convert this image to a video.
Generate a Prompt for Video Generation
The enhance_video_prompt_with_openai function turns user choices into safe, creative video prompts using GPT-4.1-mini. It adapts tone based on profession i.e., serious for warriors, light and funny for others, while keeping content family-friendly.
To maintain consistency, it also ensures the character’s face stays the same across the video. Along with user selections, the image generation prompt is passed too, so the video has full context of the character and background. If OpenAI fails, a fallback prompt keeps things running smoothly.
def enhance_video_prompt_with_openai(self, action, image_prompt, ethnicity, time_period, profession, gender):
       """Enhanced video prompt generation - simplified and safe"""


       if profession == "WARRIOR":


           video_prompt_base = f"""
           Context from image prompt : {image_prompt}
           Get Context from image prompt and generate a detailed and safe video prompt:
           - Character: A {gender} {ethnicity.value} {profession.value}
           - Action: {action.value}
           - Time Period: {time_period.value}
           - Focus entirely on the action.
           - Keep the language simple and appropriate.
           - Scene should be realistic.
           - Avoid controversial topics or violence.
           - Video should be appropriate for all ages.
           """
       else:
           video_prompt_base = f"""
           Context from image prompt : {image_prompt}
           Get Context from image prompt and generate a simple, safe and funny video prompt:
           - Character: A {gender} {ethnicity.value} {profession.value}
           - Action: {action.value}
           - Time Period: {time_period.value}
           - Focus entirely on the action.
           - Keep the language simple and appropriate.
           - Make it little bit funny.
           - Scene should be realistic and funny.
           - Avoid controversial topics or violence.
           - Video should be appropriate for all ages
           """

       try:
           response = self.openai_client.chat.completions.create(
               model="gpt-4.1-mini",
               messages=[{"role": "user", "content": video_prompt_base}],
               max_tokens=60,
               temperature=0.5
           )
           enhanced_video_prompt = response.choices[0].message.content.strip()
           enhanced_video_prompt = enhanced_video_prompt+" Keep face of the @person consistent in whole video."
           return enhanced_video_prompt
       except Exception as e:
           print(f"Error enhancing video prompt: {e}")
           # Fallback prompt - very simple
           return f"{gender} {ethnicity.value} {profession.value} from {time_period.value} performing {action.value}, professional video"
Generate Video with Seedance V1 Pro
For video generation, we are using the Seedance V1 Pro model. To access this model, we are using fal.ai. Fal AI provides access to Seedance Pro at a much cheaper price. I have tested many video generation models like Veo3, Kling AI, and Hailuo. I find Seedance best for this purpose as it has much better face consistency and is much cheaper. The only drawback is that it doesn’t provide audio/music in the video.
def generate_video_with_fal(self, image_path, video_prompt):
       """Generate video using fal_client API with error handling"""
       try:
           print("Generating video with fal_client...")
           print(f"Using video prompt: {video_prompt}")

           # Upload the generated image to fal_client
           print("Uploading image to fal_client...")
           image_url = fal_client.upload_file(image_path)
           print(f"Image uploaded successfully: {image_url}")

           # Call the model with the uploaded image URL
           print("Starting video generation...")
           result = fal_client.subscribe(
               "fal-ai/bytedance/seedance/v1/pro/image-to-video",
               arguments={
                   "prompt": video_prompt,
                   "image_url": image_url,
                   "resolution": "720p",
                   "duration": 10
               },
               with_logs=True,
               on_queue_update=self.on_queue_update,
           )

           print("Video generation completed!")
           print("Result:", result)

           # Extract video URL from result
           if result and 'video' in result and 'url' in result['video']:
               video_url = result['video']['url']
               print(f"Video URL: {video_url}")

               # Download the video
               print("Downloading generated video...")
               response = requests.get(video_url)

               if response.status_code == 200:
                   # Generate unique filename for video
                   unique_id = str(uuid.uuid4())
                   timestamp = datetime.now().strftime("%Y%m%d_%H%M%S")
                   video_filename = f"generated_video_{timestamp}_{unique_id}.mp4"
                   video_filepath = os.path.join('final_videos', video_filename)

                   # Save the video
                   with open(video_filepath, "wb") as file:
                       file.write(response.content)

                   print(f"Video generated successfully: {video_filepath}")
                   return video_filepath
               else:
                   print(f"Failed to download video. Status code: {response.status_code}")
                   return None
           else:
               print("No video URL found in result")
               print("Full result structure:", result)
               return None

       except Exception as e:
           print(f"Error generating video with fal_client: {e}")
           if "sensitive" in str(e).lower():
               print("Content flagged as sensitive. Trying with a simpler prompt...")
               # Try with very basic prompt
               basic_prompt = "person moving"
               try:
                   image_url = fal_client.upload_file(image_path)
                   result = fal_client.subscribe(
                       "fal-ai/bytedance/seedance/v1/pro/image-to-video",
                       arguments={
                           "prompt": basic_prompt,
                           "image_url": image_url,
                           "resolution": "720p",
                           "duration": 10
                       },
                       with_logs=True,
                       on_queue_update=self.on_queue_update,
                   )

                   if result and 'video' in result and 'url' in result['video']:
                       video_url = result['video']['url']
                       response = requests.get(video_url)

                       if response.status_code == 200:
                           unique_id = str(uuid.uuid4())
                           timestamp = datetime.now().strftime("%Y%m%d_%H%M%S")
                           video_filename = f"generated_video_{timestamp}_{unique_id}.mp4"
                           video_filepath = os.path.join('final_videos', video_filename)

                           with open(video_filepath, "wb") as file:
                               file.write(response.content)

                           print(f"Video generated with basic prompt: {video_filepath}")
                           return video_filepath

               except Exception as e2:
                   print(f"Even basic prompt failed: {e2}")
                   return None
           return None
Output:
Add your logo in the video (optional):
If you’re creating a video for your organization, you can easily add a watermark to it. This helps protect your content by preventing others from using the video for commercial purposes.
The add_logo_to_video function adds a logo watermark to a video. It checks if the logo exists, resizes it, and places it in the bottom-right corner of every frame. The processed frames are saved as a new video with a unique name. If something goes wrong, it skips the overlay and keeps the original video.
def add_logo_to_video(self, video_path, logo_width=200):
       """Add logo overlay to video before emailing"""
       try:
           print("Adding logo overlay to video...")

           # Check if logo file exists
           if not os.path.exists(self.logo_path):
               print(f"Logo file not found at {self.logo_path}. Skipping logo overlay.")
               return video_path

           # Load logo with transparency using Pillow
           logo = Image.open(self.logo_path).convert("RGBA")

           # Open the input video
           cap = cv2.VideoCapture(video_path)

           # Get video properties
           width = int(cap.get(cv2.CAP_PROP_FRAME_WIDTH))
           height = int(cap.get(cv2.CAP_PROP_FRAME_HEIGHT))
           fps = cap.get(cv2.CAP_PROP_FPS)
           fourcc = cv2.VideoWriter_fourcc(*'mp4v')

           # Create output filename
           unique_id = str(uuid.uuid4())
           timestamp = datetime.now().strftime("%Y%m%d_%H%M%S")
           output_filename = f"video_with_logo_{timestamp}_{unique_id}.mp4"
           output_path = os.path.join('final_videos', output_filename)

           out = cv2.VideoWriter(output_path, fourcc, fps, (width, height))

           # Resize logo to specified width
           logo_ratio = logo_width / logo.width
           logo_height = int(logo.height * logo_ratio)
           logo = logo.resize((logo_width, logo_height))

           frame_count = 0
           total_frames = int(cap.get(cv2.CAP_PROP_FRAME_COUNT))

           while True:
               ret, frame = cap.read()
               if not ret:
                   break

               # Show progress
               frame_count += 1
               if frame_count % 10 == 0:
                   progress = (frame_count / total_frames) * 100
                   print(f"Processing frame {frame_count}/{total_frames} ({progress:.1f}%)")

               # Convert frame to PIL Image
               frame_pil = Image.fromarray(cv2.cvtColor(frame, cv2.COLOR_BGR2RGB)).convert("RGBA")

               # Calculate position (bottom right corner with padding)
               pos = (frame_pil.width - logo.width - 10, frame_pil.height - logo.height - 10)

               # Paste the logo onto the frame
               frame_pil.alpha_composite(logo, dest=pos)

               # Convert back to OpenCV BGR format
               frame_bgr = cv2.cvtColor(np.array(frame_pil.convert("RGB")), cv2.COLOR_RGB2BGR)

               out.write(frame_bgr)

           cap.release()
           out.release()

           print(f"Logo overlay completed: {output_path}")

           return output_path

       except Exception as e:
           print(f"Error adding logo to video: {e}")
           print("Continuing with original video...")
           return video_path
Send this Video via Email
Once the video is generated, users will want to view and download it. This function makes it possible by sending the video directly to the email address they provided.
def send_email_with_attachments(self, recipient_email, image_path, video_path):
       """Send email with generated content using yagmail"""
       try:
           # Get email credentials from environment variables
           sender_email = os.getenv('SENDER_EMAIL')
           sender_password = os.getenv('SENDER_PASSWORD')

           if not sender_email or not sender_password:
               print("Email credentials not found in environment variables")
               return False

           yag = yagmail.SMTP(sender_email, sender_password)

           subject = "Your AI Generated Character Image and Video"

           body = f"""
           Hello!

           Your AI-generated character content is ready!

           Attached you'll find:
           - Your generated character image
           - Your generated character video (with logo overlay)

           Thank you for using our AI Image-to-Video Generator!

           Best regards,
           AI Generator Team
           """

           attachments = []
           if image_path:
               attachments.append(image_path)
           if video_path:
               attachments.append(video_path)

           yag.send(
               to=recipient_email,
               subject=subject,
               contents=body,
               attachments=attachments
           )

           print(f"Email sent successfully to {recipient_email}")
           return True

       except Exception as e:
           print(f"Error sending email: {e}")
           return False
At this stage, you’ve built the core engine of your web app, generating an image, creating a video, adding a logo, and sending it to the user via email. The next step is to connect it all together by developing the frontend and backend for the web app.
Challenges
Building a personalized video generation web app comes with several technical and operational challenges:
1. Handling AI Failures and API Errors
- AI models for image and video generation can fail unexpectedly.
- APIs may return errors or produce undesired outputs.
- Fallback strategies were essential to ensure smooth operation, such as using simplified prompts or alternative generation methods.
2. Managing Sensitive Content
- AI-generated content can inadvertently produce inappropriate results.
- Implementing checks and safe prompts ensured that all outputs remained family-friendly.
3. User Expectations for Personalization
- Users expect highly accurate and personalized results.
- Ensuring gender, ethnicity, profession, and other details were correctly reflected required careful prompt design and validation.
4. Finalizing the Video Generation Model
- Finding a model that maintained face consistency at a reasonable cost was challenging.
- After testing multiple options, Seedance V1 Pro via Fal.ai offered the best balance of quality, consistency, and price.
5. Fake or Unreliable Aggregators
- Choosing a reliable model provider was tricky. Fal.ai worked well, but earlier I experimented with others:
- Replicate.com: Fast but limited customization options, and later faced payment issues.
- Pollo.ai: Nice interface, but their API service was unreliable; it generated no videos.
- The key takeaway: avoid fake or unreliable providers; always test thoroughly before committing.
6. Time Management and Performance
- Video generation is time-consuming, especially for real-time demos.
- Optimizations like LRU caching and multiple API instances helped reduce latency and improve performance during events.
Beyond the Time Capsule: What Else Could You Build?
The Time Capsule is just one example of a personalized video generation app. The core engine can be adapted to create a variety of innovative applications:
- Personalized Greetings: Generate birthday or festival videos featuring friends and family in historical or fantasy settings.
- Marketing & Branding: Produce promotional videos for businesses, adding logos and customized characters to showcase products or services.
- Educational Content: Bring historical figures, scientific concepts, or literature scenes to life in a visually engaging way.
- Interactive Storytelling: Allow users to create mini-movies where characters evolve based on user input, choices, or actions.
- Gaming Avatars & Animations: Generate personalized in-game characters, action sequences, or short cutscenes for game storytelling.
The possibilities are endless, any scenario where you want personalized, visual, and interactive content, this engine can help bring ideas to life.
Conclusion
The Time Capsule web app shows just how far AI has come, from generating text and images to creating personalized videos that truly feel like your own. You start with a simple photo, pick a time period, profession, and action, and in moments, the AI brings your historical or fantasy self to life. Along the way, we handle challenges like AI errors, sensitive content, and time-consuming video generation with smart fallbacks and optimizations. What makes this exciting isn’t just the technology, it’s the endless possibilities.
From fun personalized greetings to educational storytelling, marketing videos, or interactive mini-movies, this engine can be adapted to bring countless creative ideas to life. With a little imagination, your Time Capsule can be the start of something truly magical.
Login to continue reading and enjoy expert-curated content.
Source link


Add comment