
What if you could build a functional ChatGPT-like AI for $100? Andrej Karpathy’s new nanochat tells you exactly that! Launched on October 13, 2025, Karpathy’s nanochat project is an open-source LLM coded in roughly 8,000 lines of PyTorch. It gives you a straightforward roadmap on how to train a language model from scratch and make your own private AI in a couple of hours. In this article, we will talk about the newly released nanochat and how to properly set it up for the training step by step.
What is nanochat?
The nanochat repository provides a full-stack pipeline to train a minimal ChatGPT clone. It takes care of everything from tokenization to the end web user interface. This system is a successor to the previous nanoGPT. It introduces key features such as supervised fine-tuning (SFT), reinforcement learning (RL), and enhanced inference.
Key Features
The project has a number of significant components. It incorporates a new Rust-built tokenizer for high performance. The training pipeline employs quality data such as FineWeb-EDU for pretraining. It also employs specialized data such as SmolTalk and GSM8K for post-training fine-tuning. For security, the model can run code inside a Python sandbox.
The project works well within your budget. The fundamental “speedrun” model is around $100 and trains for four hours. You can also develop a more robust model for approximately $1,000 with roughly 42 hours of training.
Performance
The performance increases with the training time.
- 4 hours: The quick run gives you a simple conversational model. It can compose simple poems or describe concepts such as Rayleigh scattering.
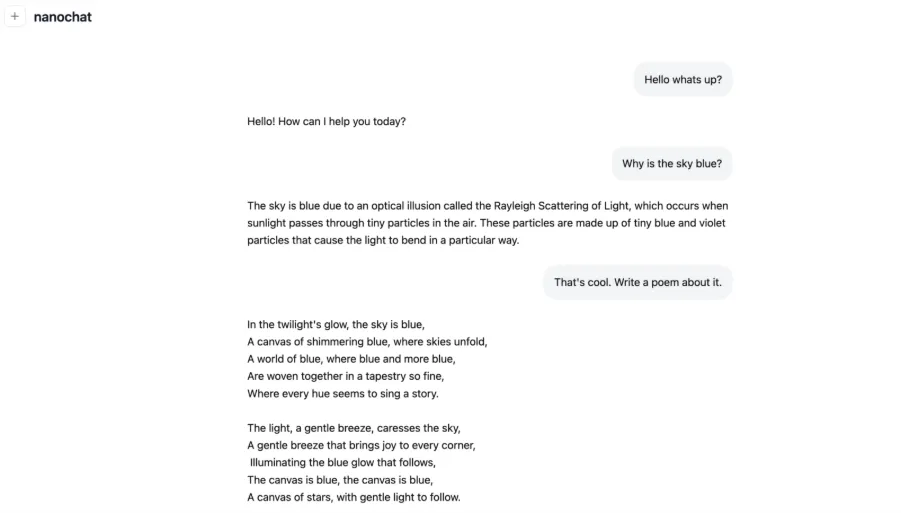
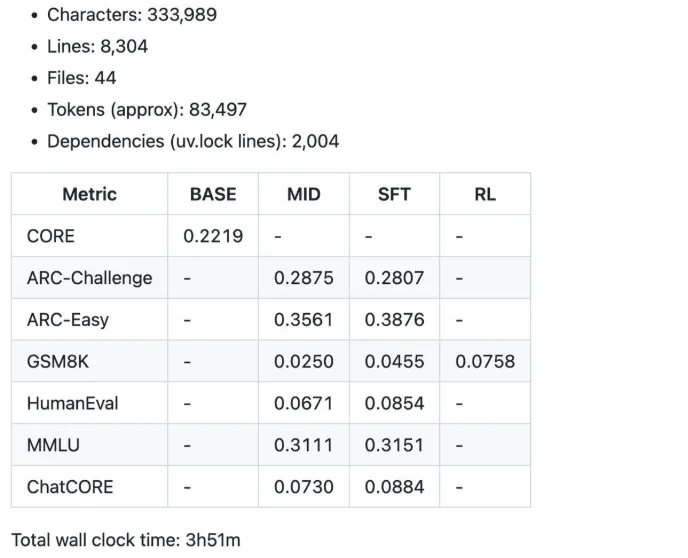
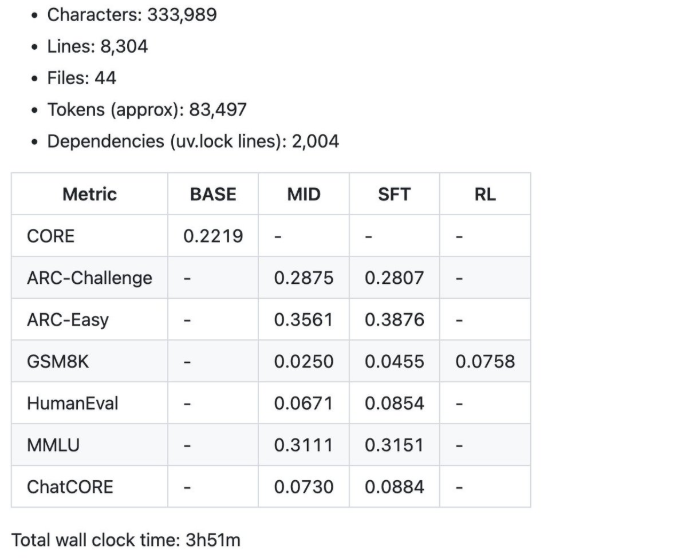
Some of the summary metrics were produced by the $100 speedrun for 4 hours.
- 12 hours: The model begins to surpass GPT-2 on the CORE benchmark.
- 24 hours: It gets decent scores, such as 40% on MMLU and 70% on ARC-Easy.
The primary educational aim of the nanochat project is to provide an easy, hackable baseline. This makes it a great resource for students, researchers, and AI hobbyists.
Prerequisites and Setup
Before you start, you must ready your hardware and software. It is easy to do with the correct tools.
Hardware Requirements
The project is best handled by an 8xH100 GPU node. These are available on providers such as Lambda GPU Cloud for about $24 an hour. You can also use a single GPU with gradient accumulation. This is a slower method, but eight times slower.
Software
You’ll require a standard Python environment along with PyTorch. The project relies upon the uv package manager to manage dependencies. You will also require Git installed in order to clone the repository. As an optional choice, you may include Weights & Biases for logging your training runs.
Initial Steps
Cloning the official repository comes first:
git clone [email protected]:karpathy/nanochat.git Second, change into the project directory, i.e, nanochat, and install the dependencies.
cd nanochat Lastly, create and attach to your cloud GPU instance to start training.
Guide for Training Your Own ChatGPT Clone
What follows is a step-by-step guide to training your very first model. Paying close attention to these steps will yield a working LLM. The official walkthrough in the repository contains more information.
Step 1: Environment Preparation
First, boot your 8xH100 node. Once up, install uv package manager using the supplied script. It is smart to have long-running things inside a screen session. This makes the training proceed even when you disconnect.
# install uv (if not already installed)
command -v uv &> /dev/null || curl -LsSf https://astral.sh/uv/install.sh | sh
# create a .venv local virtual environment (if it doesn't exist)
[ -d ".venv" ] || uv venv
# install the repo dependencies
uv sync
# activate venv so that `python` uses the project's venv instead of system python
source .venv/bin/activate
Step 2: Data and Tokenizer Setup
First, we need to install Rust/Cargo so that we can compile our custom Rust tokenizer.
# Install Rust / Cargo
curl --proto '=https' --tlsv1.2 -sSf https://sh.rustup.rs | sh -s -- -y
source "$HOME/.cargo/env"
# Build the rustbpe Tokenizer
uv run maturin develop --release --manifest-path rustbpe/Cargo.toml
The pretraining data is just the text of a lot of webpages, and for this part, we will use the FineWeb-EDU dataset. But Karpathy recommends using the following version.
https://huggingface.co/datasets/karpathy/fineweb-edu-100b-shuffle
python -m nanochat.dataset -n 240 Once downloaded, you train the Rust tokenizer on a large corpus of text. This step is made to be fast by the script. It should compress to approximately a 4.8 to 1 compression ratio.
python -m scripts.tok_train --max_chars=2000000000
python -m scripts.tok_eval
Step 3: Pretraining
Now, you must download the evaluation data bundle. This is where the test datasets for the model’s performance reside.
curl -L -o eval_bundle.zip https://karpathy-public.s3.us-west-2.amazonaws.com/eval_bundle.zip
unzip -q eval_bundle.zip
rm eval_bundle.zip
mv eval_bundle "$HOME/.cache/nanochat"
Also, setup wandb for seeing nice plots during training. uv already installed wandb for us up above, but you still have to set up an account and log in with:
wandb login Now you may initiate the main pretraining script. Execute it with the torchrun command to leverage all eight GPUs. The process trains the model on simple language patterns from the FineWeb-EDU corpus. This stage requires around two to three hours for speedrun. This is a vital part of the process for training a language model.
torchrun --standalone --nproc_per_node=8 -m scripts.base_train -- --depth=20 We’re initiating training on 8 GPUs using the scripts/base_train.py script. The model is a 20-layer Transformer. Each GPU handles 32 sequences of 2048 tokens per forward and backward pass, giving a total of 32 × 2048 = 524,288 (≈0.5M) tokens processed per optimization step.
If Weights & Biases (wandb) is configured, you can add the –run=speedrun flag to assign a run name and enable logging.
When training begins, you’ll see an output similar to the following (simplified here for clarity):
Step 4: Midtraining and SFT
Once pretraining, you proceed to midtraining. Midtraining applies the SmolTalk dataset to provide the model with more conversational power. After that, you will conduct supervised fine-tuning (SFT) on data such as GSM8K. This is what aids the model in learning to execute instructions as well as solving problems.
We can start the mid-training as follows: this run only takes about 8 minutes, a lot shorter than pre-training at ~3 hours.
torchrun --standalone --nproc_per_node=8 -m scripts.mid_train After mid-training comes the Finetuning stage. This phase involves another round of finetuning on conversational data, but with a focus on selecting only the highest-quality, most well-curated examples. It’s also the stage where safety-oriented adjustments are made, such as training the model on appropriate refusal behaviors for sensitive or restricted queries. This again only runs for about 7 minutes.
torchrun --standalone --nproc_per_node=8 -m scripts.chat_sft Step 5: Optional RL
The nanochat open-source LLM also has preliminary reinforcement learning support. You can run a technique known as GRPO on the GSM8K dataset. This is an optional process and may take another hour. Check that Karpathy said RL support is still in its infancy.
torchrun --standalone --nproc_per_node=8 -m scripts.chat_rl Step 6: Inference and UI
With training finished, you can now run the inference script. This enables you to talk to your model using a web UI or command-line interface. Try running it with some examples like “Why is the sky blue?” to experience your creation.
python -m scripts.chat_cli (for Command line window) OR
python -m scripts.chat_web. (for Web UI) The chat_web script will serve the Engine using FastAPI. Make sure to access it correctly, e.g., on Lambda, use the public IP of the node you’re on, followed by the port, so for example http://209.20.xxx.xxx:8000/, etc.
Step 7: Review Results
Now, testing it with the web interface on the link on which the nanochat is hosted.
Lastly, look at the report.md in the repository. It has some important metrics for your model, such as its CORE score and GSM8K accuracy. The base speedrun runs for approximately $92.40 to put in a bit less than four hours of work.
Note: I have taken the code and steps from Andrej Karapathy’s nano chat GitHub. You can find full documentation here. What I showcased above is a simpler and shorter version.
Customizing and Scaling
The speedrun is an excellent starting point. From that point, you can further customize the model. This is one of the most significant advantages of Karpathy’s nanochat release.
Tuning Options
You can tweak the depth of the model to improve performance. With the --depth=26 flag, say, you step into a more powerful $300 range. You might also try using other datasets or altering training hyperparameters.
Scaling Up
The repository details a $1,000 level. This entails an extended training run of approximately 41.6 hours. It yields a model with improved coherence and higher benchmark scores. If you are facing VRAM constraints, attempt to lower the --device_batch_size setting.
Personalization Challenges
Others can fine-tune the model on personal data. Karpathy advises against this, as this can end up generating “slop.” A better way to use personal data is retrieval-augmented generation (RAG) via tools such as NotebookLM.
Conclusion
The nanochat project enables both researchers and beginners. It offers a cheap and simple way to train a strong open-source LLM. With a limited budget and an open weekend, you can go from setup to deployment. Use this tutorial to train your own ChatGPT, check out the nanochat repository, and participate in the community forum to help out. Your adventure to train a language model begins here.
Frequently Asked Questions
A. Nanochat is an open-source PyTorch initiative by Andrej Karpathy. It provides an end-to-end pipeline to train a ChatGPT-style LLM from scratch cheaply.
A. It costs about $100 to train a basic model and takes four hours. More powerful models can be trained with budgets of $300 to $1,000 with extended training durations.
A. The suggested configuration is an 8xH100 GPU node, and you can lease this from cloud providers. It is possible to use a single GPU, but it will be much slower.
Harsh Mishra is an AI/ML Engineer who spends more time talking to Large Language Models than actual humans. Passionate about GenAI, NLP, and making machines smarter (so they don’t replace him just yet). When not optimizing models, he’s probably optimizing his coffee intake. 🚀☕
Login to continue reading and enjoy expert-curated content.
Source link


Add comment